
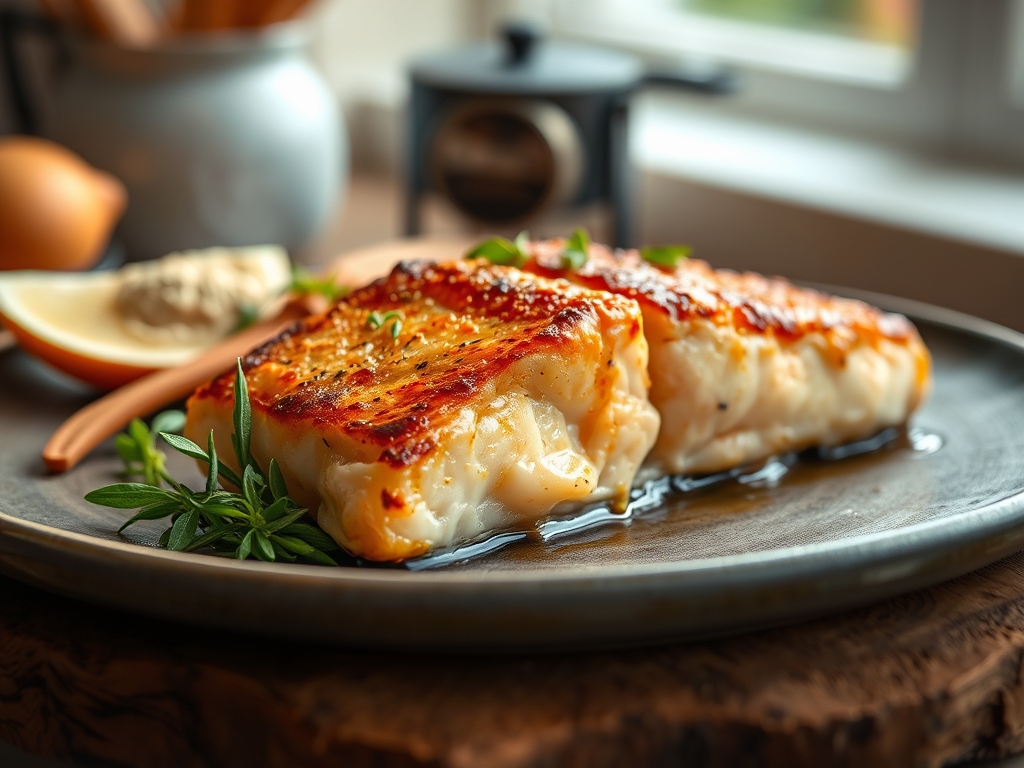
Imagine the sound of a cold fillet hitting a blistering hot skillet. It is that distinctive, aggressive hiss that signals the start of a culinary transformation. We have all been there; staring at a beautiful piece of fish and praying it does not stick to the pan or turn into a dry, chalky mess. Mastering easy pan fried salmon recipes is not just about following a timer; it is about understanding the physics of heat transfer and the chemistry of proteins. When you get it right, the skin shatters like glass under your fork, while the interior remains a buttery, translucent pink that melts on your tongue. This is the ultimate weeknight luxury. It is fast, high in omega-3 fatty acids, and remarkably forgiving once you know the secret handshakes of the professional kitchen. Today, we are stripping away the intimidation and replacing it with pure, scientific confidence so you can produce restaurant-quality results in less time than it takes to order delivery.
The Gathers:
Before we ignite the burner, we must assemble our mise-en-place. Success in the kitchen is 80 percent preparation. You will need a heavy-bottomed skillet, preferably cast iron or stainless steel, to ensure even heat distribution and prevent hot spots that scorch the delicate flesh. Grab your tongs for precise flipping and a microplane for the aromatic finishing touches.
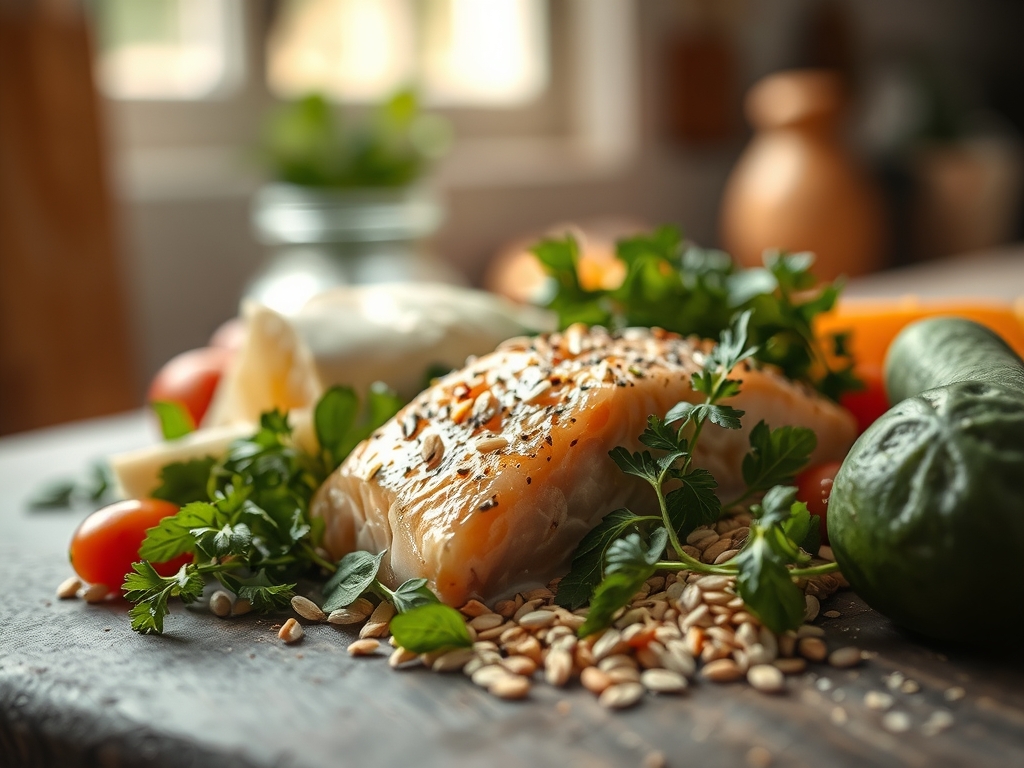
The star of the show is the salmon. Look for fillets that are vibrant and firm; they should not have a viscous coating or a "fishy" odor. You will also need a high-smoke-point oil like avocado or grapeseed oil. Butter is delicious, but its milk solids burn too quickly for the initial sear. We use a digital scale to ensure our portions are uniform, which guarantees they cook at the same rate.
Smart Substitutions: If you are avoiding dairy, swap the finishing butter for a spoonful of white miso paste to add a piquant, savory depth. No fresh lemons? A splash of rice wine vinegar provides the necessary acidity to cut through the fatty lipids of the fish. If you lack a saucier for making a side glaze, a small small saucepan works perfectly for reducing liquids into a thick syrup.
The Clock
Efficiency is the hallmark of a "Chef's Flow." Total active prep time is exactly five minutes, while the cooking process takes between eight and ten minutes depending on the thickness of your fillets.
The flow begins with the "Chill Break." Take your salmon out of the refrigerator fifteen minutes before cooking. This allows the internal temperature to rise slightly, preventing a "thermal shock" where the outside overcooks while the center remains ice-cold. While the fish rests, use your bench scraper to clear your workspace and prep your aromatics. The goal is to have the table set and the wine poured before the fish ever touches the heat. Salmon is best served immediately; it waits for no one.
The Masterclass
1. The Desiccation Ritual
The enemy of a crispy sear is moisture. Use a paper towel to pat the salmon bone-dry on all sides. If the surface is damp, the heat of the pan will create steam rather than a sear.
Pro Tip: This is the science of the Maillard Reaction. By removing surface water, you allow the proteins and sugars to bond at high heat, creating that golden-brown crust and complex savory flavor profiles.
2. Seasoning the Canvas
Generously coat the fillets with kosher salt and cracked black pepper just seconds before they hit the pan. If you salt too early, the salt will draw moisture out of the cells via osmosis, making the surface wet again.
Pro Tip: Salt acts as a denaturant, slightly breaking down the protein strands on the surface to create a tighter, more cohesive crust during the frying process.
3. The Cold Oil Start
Heat your heavy-bottomed skillet over medium-high heat until the oil begins to shimmer and move like water. Place the salmon skin-side down, pressing firmly with a spatula for ten seconds to ensure total contact.
Pro Tip: This prevents the skin from curling. As the collagen in the skin heats, it wants to contract; manual pressure forces it to stay flat, ensuring the heat renders the subcutaneous fat into a crispy layer.
4. The Patient Sear
Do not touch the fish. Let it cook skin-side down for about 90 percent of the total time. You will see the color change slowly creep up the side of the fillet from the bottom.
Pro Tip: This technique uses the skin as a "heat shield." It protects the delicate flesh from direct flame, allowing for a gentle, even cook that keeps the interior moist.
5. The Flip and Butter Baste
Once the skin is crispy, flip the fillet. Add a knob of butter, crushed garlic, and thyme to the pan. Use a large spoon to infuse the foaming butter over the fish for the final sixty seconds.
Pro Tip: This is known as Arrosage. The hot butter carries the aromatics into every crevice of the fish while providing a final burst of heat to finish the top side without overcooking it.
6. The Carryover Rest
Remove the salmon from the pan when it is slightly under your desired doneness. Place it on a warm plate and let it rest for three minutes.
Pro Tip: This accounts for thermal carryover. The residual heat trapped in the outer layers continues to move toward the center, finishing the cook perfectly while allowing the juices to redistribute.
7. The Acidic Finish
Just before serving, use your microplane to zest fresh lemon over the top and add a squeeze of juice to deglaze any remaining pan juices for a quick drizzle.
Pro Tip: Acidity acts as a chemical balance. It brightens the heavy fats and creates a "clean" finish on the palate, making each bite feel light and refreshing.
The Deep Dive
From a nutritional standpoint, salmon is a powerhouse. A standard six-ounce serving provides roughly 34 grams of protein and is rich in Vitamin B12 and Potassium. For those on specific diets, this recipe is naturally Keto and Gluten-Free. To make it Vegan, you can apply these same searing techniques to thick slabs of "King Oyster" mushrooms or firm tofu, though the cooking times will vary.
The Fix-It:
- The Stick: If the fish is stuck, it is not ready to flip. The proteins will naturally release from the pan once the crust has fully formed.
- The White Gunk: This is albumin, a protein that escapes when the fish is cooked too fast or too high. Lower your heat slightly next time.
- Soggy Skin: This happens if you crowd the pan. Ensure there is at least two inches of space between fillets so steam can escape.
Meal Prep: To reheat salmon without it turning into rubber, avoid the microwave. Use a low-temperature oven (275 degrees Fahrenheit) with a splash of water and a cover. This creates a gentle steam environment that re-hydrates the proteins.
The Wrap-Up
Mastering easy pan fried salmon recipes is a gateway to becoming a more intuitive cook. It teaches you to listen to the sizzle, watch the color gradients, and respect the resting period. Once you have the base technique down, the variations are endless. You can swap the lemon for lime and ginger, or the thyme for rosemary and chili flakes. The kitchen is your laboratory; go forth and create something spectacular!
The Kitchen Table
How do I know when the salmon is done?
The most reliable method is using a digital thermometer. Aim for an internal temperature of 125 degrees Fahrenheit for medium-rare or 135 degrees for medium. The flesh should also flake easily when pressed with a fork.
Why is my salmon skin not crispy?
The most common culprit is moisture. Ensure the skin is bone-dry before it hits the oil. Additionally, make sure the oil is shimmering hot before adding the fish to ensure an immediate sear rather than a slow soak.
Can I use frozen salmon for this?
Yes, but it must be fully thawed in the refrigerator overnight. Once thawed, treat it exactly like fresh fish. Be sure to pat away the extra moisture that typically accompanies frozen seafood to ensure a proper crust.
What is the best pan for frying salmon?
A heavy-bottomed stainless steel or cast iron skillet is best. These materials retain heat exceptionally well, which is vital for maintaining a constant temperature when the cold fish is added to the pan.
Do I have to scale the salmon first?
Most grocery store salmon comes pre-scaled, but it is always good to check. Run the back of a knife against the grain of the skin; if any hard, clear discs pop up, you need to remove them.