

Close your eyes and listen for that distinctive, aggressive hiss. It is the sound of cold protein meeting a screaming hot surface; the high-stakes theater of Japanese steakhouses right in your own kitchen. While most home cooks settle for lackluster, soggy fillets, the true secret to hibachi salmon recipes lies in the violent transformation of sugars and proteins under intense heat. We are chasing that shatteringly crisp exterior and a center so buttery it practically sighs when your fork touches it. This is not just dinner. This is a masterclass in thermal dynamics and flavor layering that will turn your kitchen into the hottest seat in town.

The Gathers:
To achieve restaurant-grade results, your mise-en-place must be flawless. Start with the centerpiece: center-cut Atlantic or King salmon fillets. You want uniform thickness to ensure even heat distribution. Use a digital scale to portion your fish into six-ounce fillets; this precision prevents the smaller tail pieces from overcooking while the thick centers remain raw.
For the marinade and searing medium, you will need high-smoke-point fats and viscous aromatics. Gather toasted sesame oil, low-sodium soy sauce, and fresh ginger. Use a microplane to grate the ginger into a fine paste; this increases the surface area for flavor extraction and ensures the ginger oils infuse the sauce without leaving woody chunks. You will also need unsalted butter for the final basting stage to create a luxurious mouthfeel.
Smart Substitutions: If you are avoiding soy, coconut aminos offer a similar piquant profile with a lower glycemic index. For the fat, avocado oil is a brilliant alternative to vegetable oil because it possesses an incredibly high smoke point of 520 degrees Fahrenheit. This allows you to achieve a deep char without the oil breaking down into acrid, bitter compounds.
The Clock
Efficiency in the kitchen is about the Chef's Flow. This is the art of sequencing tasks so that no component sits getting cold or soggy. Total active time for this dish is approximately 25 minutes, but the mental preparation starts earlier.
- The Chill (15 minutes): Pat the salmon dry and let it sit uncovered in the fridge. This air-drying phase is non-negotiable for a crispy skin.
- The Prep (10 minutes): While the fish dries, whisk your sauce components in a saucier and chop your garnish.
- The Sear (6 to 8 minutes): This is the high-heat window where the magic happens.
- The Rest (3 minutes): Essential for moisture retention.
By following this rhythm, you ensure the salmon hits the plate at the exact moment the interior reaches its translucent, flaky peak.
The Masterclass
1. The Surface Preparation
Before the fish even touches the pan, you must remove every molecule of surface moisture. Use a paper towel to press firmly onto the skin and flesh. A dry surface is the prerequisite for the Maillard reaction, the chemical reaction between amino acids and reducing sugars that gives browned food its distinctive flavor.
Pro Tip: This is known as the "Dry Brine" effect. Salt the skin side ten minutes before cooking to draw out moisture, then wipe it away. This prevents steam from forming between the fish and the pan, which is the primary cause of rubbery skin.
2. The Heavy Metal Heat
Place a heavy-bottomed skillet or a cast-iron griddle over medium-high heat. You want the pan to be "shimmering" hot. Add your avocado oil and wait for it to move fluidly across the surface like water.
Pro Tip: Using a heavy pan provides high thermal mass. When you drop a cold piece of fish onto the metal, a thin pan would lose its heat instantly. A heavy pan maintains its temperature, ensuring a constant sear that seals in juices through rapid protein coagulation.
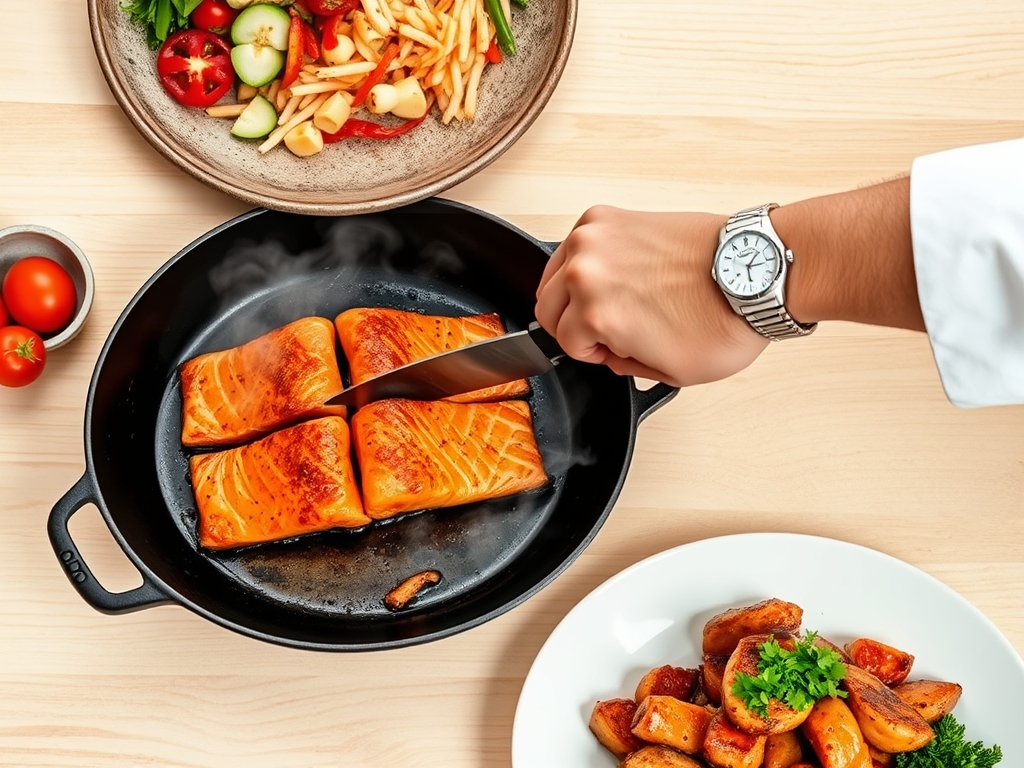
3. The Initial Sear
Lay the salmon fillets away from you to avoid oil splatter. Use tongs to press down firmly on each fillet for the first 30 seconds. This prevents the skin from curling as the collagen fibers contract.
Pro Tip: This physical pressure ensures maximum contact with the heat source. Without it, the edges of the fish will lift, leading to uneven browning and a "steamed" center rather than a seared one.
4. The Butter Baste and Deglaze
Once the skin is crisp and the fish is cooked 75 percent of the way through, flip it gently. Toss a knob of butter and a splash of your soy-ginger mixture into the pan. Use a spoon to continuously pour the foaming butter over the fish.
Pro Tip: This is called Arrosage. The milk solids in the butter brown quickly, creating a nutty aroma, while the liquid helps deglaze the flavorful browned bits from the bottom of the pan and coat the fish in a savory glaze.
5. The Carryover Rest
Remove the salmon when a meat thermometer reads 125 degrees Fahrenheit for medium-rare. Move it to a warm plate and let it sit.
Pro Tip: This accounts for thermal carryover. The internal temperature will continue to rise by 5 to 7 degrees after it leaves the pan. If you wait until it looks "done" in the pan, it will be overcooked and chalky by the time it reaches the table.
The Deep Dive
From a nutritional perspective, hibachi salmon is a powerhouse. A standard six-ounce serving provides roughly 34 grams of high-quality protein and is rich in Omega-3 fatty acids, which are essential for brain health and reducing inflammation.
Dietary Swaps: For a Keto version, replace the sugar in any sauce with liquid monk fruit or erythritol. For a Vegan alternative, use "Salmon Blocks" made from pressed, marinated tofu or konjac root, though you will need to increase the oil in the pan to mimic the natural fats of the fish.
The Fix-It:
- Fish Sticking: If the fish won't budge, do not force it. It will naturally release from the pan once the crust has fully formed.
- White Gunk (Albumin): If you see white liquid seeping out, you are cooking it too fast or too long. This is protein being squeezed out of the muscle fibers. Lower the heat slightly next time.
- Burnt Garlic: If your aromatics are turning black, you added them too early. Always add garlic and ginger in the final 90 seconds of cooking.
Meal Prep: To reheat hibachi salmon without ruining the texture, avoid the microwave. Use a toaster oven at 275 degrees Fahrenheit for 10 minutes. This gently warms the fats without re-cooking the protein to a leathery consistency.
The Wrap-Up
Mastering hibachi salmon recipes is about more than just following a list of ingredients; it is about respecting the physics of the pan. By controlling moisture, managing thermal mass, and utilizing the finishing power of a butter baste, you elevate a simple fillet into a culinary event. Remember to keep your tools sharp, your pan hot, and your ginger fresh. Now, go forth and sear with confidence!
The Kitchen Table
How do I get the skin extra crispy?
The secret is total dehydration. Pat the skin dry with paper towels and let it air-dry in the fridge for an hour. Use a bench scraper to remove any scales, then sear skin-side down with firm pressure in a hot skillet.
What is the best oil for hibachi?
Always choose an oil with a high smoke point. Avocado oil or refined grapeseed oil are ideal. Avoid extra virgin olive oil or unrefined sesame oil for the initial sear, as they will smoke and turn bitter at hibachi temperatures.
Can I make this in a non-stick pan?
You can, but you will lose the superior crust. Non-stick coatings cannot safely reach the temperatures required for a true hibachi sear. For the best results, stick to cast iron or carbon steel to maximize the Maillard reaction.
How do I know when the salmon is done?
Use a digital thermometer to check the thickest part of the fillet. Aim for 125 to 130 degrees Fahrenheit for a moist, medium finish. The flakes should separate easily with a fork but still look slightly translucent in the very center.